Exploring the world of frontend engineering as a backend engineer part I - Build tools
May 27th, 2025
For the majority of my career so far, I have worked as a fullstack engineer. I would say I have spent 95% of my time on the backend and 5% on the frontend. I can work my way around a frontend system. I know some basic concepts of React like components, hooks etc. If I am building a new API endpoint in the backend service, I can build a few components and a React page to consume the API and display the data to the user with very little hand holding.
But what I lack is a deep understanding of how frontend systems work. In my head when I think of a frontend systems I think of a couple of HTML webpages that define the layout of the webpage. CSS to style the HTML webpages and Javascript/typescript files to make the webpages interactive.
So I decided I wanted to gain deeper knowledge of how frontend systems work so I gave myself 2 weeks time to learn as much as I can. My goal was to learn the science behind frontend engineering, not just some APIs or frameworks or libraries. I wanted to develop a deeper understanding of what problems a particular tools/framework/library solves. What are the tradeoffs it makes. Why was that tool created. How did people solve these problems before this tool was invented, etc. I was trying to learn the computer science aspect of frontend engineering.
Now the target audience for my post series is someone like me. A mostly backend engineer who has worked on Java/C++ who is occasionally tasked with implementing something in the frontend. If you are a NodeJS backend engineer you might not get a lot of value out of this post as you might already know a lot of things that I will be covering in these posts.
Having said all of that, here are my learnings.
Search engine rankings - The way websites get compared
One of the main reasons the world of frontend engineering can seem so complicated is because one, you are shipping code to the user's browser on the fly. As soon as the user opens up your website, their browser starts downloading your code. And it is also starts downloading images, fonts and everything else as well. And it doesn't wait for everything to finish downloading. It starts rendering your website as soon as it has enough material. Which most likely means that just the index.html file. Two, you don't really have any control over the environment where you code runs. Maybe the browser where your code is running supports an ECMA script feature that you are using in your code. Or maybe it doesn't. As a backend engineer you don't have to worry about any of these things at all. Your backend service is ready to start serving traffic when you say it is ready to start serving traffic. And most of the time you can pick the environment where your service runs.
You can obviously ignore both of these concerns completely. And you can say that as long as my code works for a subset of people on the internet I am happy. But the problem with that approach is that if only a subset of people on the internet are able to use your website and a significant chunk of users are not able to use your website, search engines are less likely to recommend your website to anyone.
Ofcourse the way search engines rank websites is incredibly complicated. The content you put on your website probably plays a significant role in deciding the position of your website in search rankings. But assuming you and your competitor have equally good content and the visitors of your website have a bad experience and your competitors website works like a charm, guess which website will rank higher in Google search rankings? Obviously not yours.
So ensuring that your clients have a good experience is of paramount importance. As a developer you might have no control over the content in your website, but you most definitely have a lot control over the user experience. But what makes for a good user experience you might ask? Google has an article explaining what makes for a good user experience here
There are some general heuristics that you can follow to ensure your users have a good experience like not overloading your website with ads for example. But the question of how many ads to display is quite subjective. A few more of these heuristics like this one are listed in the link above. In addition to these subjective heuristics, there are also some objective metrics that you can optimize for called the core web vitals. Different search engines might have different names for these metrics, but "core web vitals" is what Google calls them. Your website's core web vital score is composed of the following three metrics:
- Largest Contentful Paint (LCP) This is a metric that meaures how long it took for your website to load and render. Having an LCP under 2.5 seconds is a good score according to google.
- Interaction To Next Paint (INP) This is an aggregate metric that measures how long it took for your website to respond to various user interactions. I.e. this metric measures how responsive your website is. Ideally this score should be less than 200 milliseconds
- Cumulative Layout Shift (CLS). This measures how stable your web page is. If your webpage is constantly loading fresh new data and the content is constantly shifting around, it makes for a bad user experience. A score on this metric less than 0.1 is considered desirable.
Now you might be wondering how do these search engines measure these metrics? Well 66% of the internet users use Google Chrome according to this website. So in Google's case at least, they are just watching people interact with your website on Google chrome and collecting these metrics live. Other search engines like Bing which is owned by Microsoft who also own Edge browser might be doing something similar to this.
So obviously if you want your website to rank higher in search rankings, you need to improve your score on these metrics. Google has a tool called Lighthouse which is integrated into Chrome browser that you can use to measure your score against these metrics. Lighthouse gives you a scores, warnings and tips about other areas too that you need to focus on to improve your overall search engine rankings. Like for example if you are not serving all or some of your webpages via HTTPS, lighthouse will let you know. Even though this is not part of core web vitals, fixing these warnings will ensure that your website scores higher.
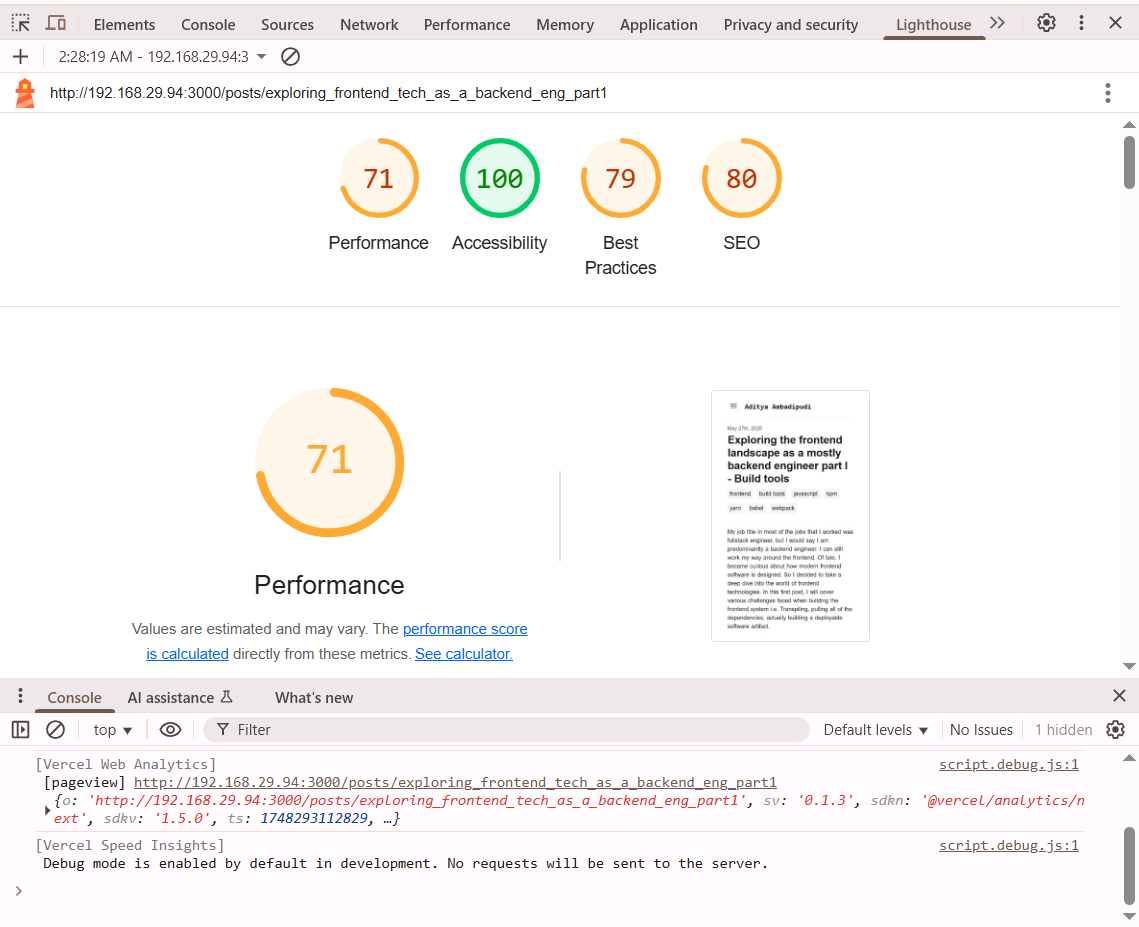 (Sample output from Lighthouse)
Now after reading all of this you might be thinking that building a good frontend is all about making sure Google or other search engines are happy with your website! But that's not the case at all. Ensuring that your webpage loads quickly, is responsive to user interactions, and the content on your webpage doesn't shift too much after it has finished loading which makes it look and feel unstable, are things that you should strive for irrespective of whether or not it gets your website ranked higher in search engine rankings. Your front end is just a software and optimizing for these metrics is a software engineering problem. And just like with any software engineering problem there is a lot of Computer Science theory that outline various options and their tradeoffs for tackling these problems. I am going to be exploring some of it in this series.
Transpilers - Babel, TSC, NextJS Compiler
The first problem that we need to tackle is ensuring that your code can run anywhere. And that does not mean writing multiple versions of the same code that can run on all the browsers and browser versions that our clients use. Or checking the browser and browser version at each step before doing something on client side which will most likely slow our webpage down significantly. Instead we will write exactly one version of frontend code in whatever Ecma script version number we are comfortable in(ES6, ES7, ES2022, whatever) and transpile it down to the lowest Ecma script version that all of our clients are garuanteed to be able to run. For doing this we need a transpiler A transpiler is a source to source compiler. It takes code written in one language and converts it to code in another language.
Babel
There are various transpilers out there that are used in building frontend systems. I will start off with Babel. Most of the time, transpiler are never run manually, but instead they are invoked by Webpack or Turbopack as a part of the build process.
To install Babel, create a new folder and run the following command:
npm install --save-dev @babel/core @babel/cli @babel/preset-env
You can use yarn or pnpm too. But I will use npm.
Then create the following js file that uses ES2015 syntax. Name the file arrow.js.
[1, 2, 3].map(n => n + 1);
The arrow function was introduced in ES2015. Now let's compile this down to ES5, using the following command:
npx babel arrow.js --out-dir lib --presets="@babel/preset-env"
This will generate the following code:
"use strict";

[1, 2, 3].map(function (n) {
  return n + 1;
});
And this code will run even in older browsers that don't support ES2015.
JSX
You can do other types of transpiling using Babel as well. For example you can use Babel to transpile JSX code to pure JS. All you need is a Babel preset for doing that. Think of a preset as a plugin along with the configuration to run that plugin.
Run the following command to install the React preset which will help us transpile JSX to pure JS code.
npm install --save-dev @babel/preset-react
And then create a JSX file with a JSX element like this and call it jsxElement.jsx:
export default function TestJsxElement() {
        return (<div> <h1> Hello World </h1> </div>);
};
Transpile the code to ordinary js using the following command:
npx babel jsxElements.jsx --out-dir lib --presets="@babel/preset-env,@babel/preset-react"
This will generate the following js file:
"use strict";

Object.defineProperty(exports, "__esModule", {
  value: true
});
exports["default"] = TestJsxElement;
function TestJsxElement() {
  return /*#__PURE__*/React.createElement("div", null, " ", /*#__PURE__*/React.createElement("h1", null, " Hello World "), " ");
}
And that my friends is how JSX code is able to run on browsers. When I first started working on a React project at work, I couldn't figure out how we were embedding HTML code directly into JS. It was only recently after I started reading about Babel and transpilers that I understood how JSX works in browsers.
Multi-browser support
Another cool thing that you can do with Babel is to just specify a list of target browsers along with the lowest version number that you wish to support for them in a babel.config.json file like this:
{
  "presets": [
    [
      "@babel/preset-env",
      {
        "targets": {
          "edge": "17",
          "firefox": "60",
          "chrome": "67",
          "safari": "11.1"
        },
        "useBuiltIns": "usage",
        "corejs": "3.6.5"
      }
    ]
  ]
}
Since you own your website you might know what browsers your visitors are using. Once you create a file like this, you can transpile all of your JS code to the appropriate ES version that is supported by all the browsers.
Polyfills
So far whatever I have shown you only involves transforming syntax in newer versions of Ecma script or JSX to older Ecma script syntax. But Babel can do something more than that.
What if you want to use a function or method or some library that was added to newer versions of ES but that is not supported in older versions of ES? Then it's not a matter of transforming syntax anymore. It's a matter of adding the missing code. That's when you need Polyfills. They are basically like a library/module that you import into you code that will provide the missing code you need to run latest version of ES code on older browsers. Polyfills are not just for backporting missing code to older browsers. They fix broken implementations too. One thing to note about Polyfills is that it is important to import Polyfill at global scope and make sure it runs before anything else. They need to be the first thing that runs on your webpage. So they can patch all the problematic code.
The most famous example of code that needs polyfill is the following. Save it into a file called promise.js:
Promise.resolve().finally();
Install the polyfill dependency
npm install --save @babel/polyfill
And then invoke babel on the file to transpile it.
npx babel promise.js --out-dir lib
And it will generate the following file:
"use strict";

require("core-js/modules/es7.promise.finally.js");
Promise.resolve().finally();
And Babel added a require statement to your code that imports a js file that adds the missing functions necessary for your code to be able to run on older broswers.
Also you might have noticed I have not specified a preset when invoking babel. It is possible to specify the polyfill option using babel-cli like I did for earlier examples. But it is more simple to use a babel.config.json file and specify the preset and it's configuration options inside the config file. Use the config file I posted just a few paragraphs above this paragraph for this example to work(in the multibrowser support section).
When you run this command, babel will automatically require a file from core-js. core-js is a collection of polyfills for supporting older browsers. Babel will exactly pull in the polyfill your code needs and won't import anything that your code doesn't need. This is because we have used the option useBuiltIns: usage option in the babel's present-env's config.
TSC and Nextjs compilers
TSC is kind of similar to babel. It is primarily used to transpile Typescript code to Javascript code. You can use Babel and TSC together. Using Babel for transpiling and TSC for typechecking. TSC from what I read supports the entirety of typescript feature set. And Babel and it's presets don't support all of the typescript features(I am not able to find where I read this). I also remember reading somewhere that Babel and TSC don't generate the same output(can't find the source of this as well). TSC is maintained by the people who own Typescript. What this might means is that TSC might support new features in TS faster than Babel.
A major distinguishing factor between all of these transpilers is the speed at which they transpile. TSC was recently re-written in Go to speed it up.
Another compiler that is incredibly fast is the NextJS compiler. NextJS is written in Rust. NextJS is quite an influential project in the world of React. They have produced a lot of tools and frameworks that improve React. But they kind of operate in a space where they have no competition I feel. And they are backed by a for-profit company Vercel. It is for this reason, I will only briefly talk about anything related to nextjs/Vercel in my blogs. I do anticipate that I will be writing a really big blog post on NextJS & Vercel in the coming weeks. A lot of discussion about the problems that frontend developers face would simply be incomplete without talking about NextJS and Vercel at length.
Dependency management - npm, Yarn, pnpm
So you have written some code using fancy new ES features. You managed to transpile it to older ES version code so even those clients who use antiquated browsers will be able to use your website. You shipped all the polyfills necessary to make sure your website works everywhere. What's the next thing you need? Libraries.
What's the problem here you may ask. Just use <script> tags to import whatever libraries you need. There are numerous problems with this approach. Firstly if your dependency has a dependency and for whatever reason they are not shipping the dependency along with their code, the onus will be on you to ensure your dependency's dependency is satisfied. Secondly what if you have two dependencies and they both need the same library to work. It obviously is not a good idea to ship two copies of the same library. Because unless both the copies of the library are delievered to the client, they won't be able to run your code. Another problem that you might face is that one dependency might require a different version of the dependency that is incompatible with the version that your second dependency needs. All of these problems can be tackled with <script> tags but that would involve a lot of manual work and a lot of things can go wrong if you are not careful. A dependency management tools helps you automate a lot of this manual work.
So the core problem that we are trying to solve in this layer is that if we are given a dependency tree of our code and all the things that we need in our code e.g. A -> B. B -> C. B -> D. And D -> E. We want a flattened dependency structure like this: [A B C D E]. Where all the things that we need are listed in list like structure. And we want each of the libraries to be able to find the dependency they need in this structure.
As deceptively simple as this problem may seem, there are quite a few challenges that the tools I mentioned tackle. The two obvious ones are minimal disk usage and fast builds. Basically we don't want the dependency management system to take up a lot of disk space. Nor do we want it to move a crap ton of files around, slowing down the build process. Finally we want the build process to be fast.
NPM
npm stands for Node package manager. To create a new npm project run the following command:
npm init
It asks you a bunch of questions and creates a file called package.json. This file contains a list of all the packages that your project depends on, as well as a lot of metadata about your project like name, version number etc.
Now when you install a library into your project for example lodash using the following command:
npm install --save-dev lodash
It modifies your package.json file and creates a new directory called node_modules and also a file called package-lock.json. The --save-dev flage declares the dependency as a dev dependency. I.e. a dependency that you only need during the development phase. In the package.json file the dependency gets saved as a devDependency.
package-lock.json is an interesting file. While the package.json file specifies a range of dependencies that your project can use. For example ^4.17.21 mean you would accept any minor version of the dependency. I.e. your code would work with 4.18.0 or 4.19.0 etc. but not 5.0.1 for example. And ~4.17.21 would mean that you would accept any patch version of the dependency. I.e. your code can work with 4.17.22 or 4.17.90 but it wouldn't work with 4.18.0 or 5.0.1. We specify a range for version numbers instead of a directly specifying the exact version number we need because some dependency that you specify could also be required by some other dependency of your project somewhere down the dependency tree. If both your dependency and that dependency would specify the same package as a dependency and give a range of version numbers that you are willing to accept, npm would find a common version that could support both your project and your dependency. Thus it would only include that one version of that dependency. package-lock.json is the file that specifies the exact dependencies that were included in the final build of this project. It kind of "freezes" the version numbers of the dependencies. This video explains all of this better.
node_modules is the other thing that is generated when you install your first dependency in your npm project. It contains all of the dependencies in your project as flatly as possible. Unless two of your dependencies require the same package but different, incompatible versions of it, in which case both of those versions will be installed directly inside the node_modules directory of those dependencies.
It is generally not recommended to ship the whole entire node_modules directory but instead only ship package.json and package-lock.json. One can recreate the node_modules directory at the place host location by simply running npm install.
PNPM
pnpm still follows some of the conventions of npm. In that it uses a package.json file and a node_modules folder. But where pnpm differs from npm is the fact all the dependencies of pnpm reside in a global content-addressable location on the host. And each individual dependency of a project inside the node_modules folder is just a symlink to location inside the global location where the dependencies are present. If a dependency of your project has a dependency on another project that is a direct dependency of your project than instead of hardlinking to the global dependency twice, the dependency of your project will softlink to the dependency that is direct dependency of your project. Using these hard symlinks and soft symlinks, pnpm saves a lot of disk space and avoids unnecessary copying of files/directories during build & installation steps.
pnpm also avoids a couple of obvious bugs that npm has. For example if your dependency requires a project that gets installed into your node_modules folder, the code in your project can directly use the code in the dependency that you dependency depends on, even without explicitly mentioning it in package.json or installing it via pnpm add. This could lead to a problem where your project could break if your dependency either drops or changes the version number of it's dependency that your project indirectly depends on. pnpm doesn't allow you to use any dependency without explicitly adding it to your project using a pnpm add.
To demonstrate this issue. Create a new folder and initialize it with npm and install @babel/core into it. This will pull in about 40 packages and add them to the root directory of your node_modules folder. At the time of writing this article(31st May 2025), a package called canIuse-Lite was listed as a dependency of babel-core. You can directly use this package, even though you never installed it using npm install or added it to your package.json file. To demonstrate this. Create the following js file called test.js
import * as lite from 'caniuse-lite';
console.log(lite.default.agents['edge']);
And then run it using this command node test.js. It will output something like this:
{
  usage_global: {
    '12': 0,
    '13': 0,
    '14': 0,
    '15': 0,
    '16': 0,
    '17': 0,
    '18': 0.10932,
    '79': 0,
    '80': 0,
    '81': 0,
    '83': 0,
However if you repeat the same experiment with pnpm. I.e. create a new directory and initialize it with pnpm and install @babel/core into that project and copy this file into this new directory and execute it, you will get the following error message:
node:internal/modules/package_json_reader:268
  throw new ERR_MODULE_NOT_FOUND(packageName, fileURLToPath(base), null);
        ^

Error [ERR_MODULE_NOT_FOUND]: Cannot find package 'caniuse-lite' imported from /home/aditya/workspace/experiments/pnpm/test.js
    at Object.getPackageJSONURL (node:internal/modules/package_json_reader:268:9)
    at packageResolve (node:internal/modules/esm/resolve:768:81)
    at moduleResolve (node:internal/modules/esm/resolve:854:18)
    at defaultResolve (node:internal/modules/esm/resolve:984:11)
    at ModuleLoader.defaultResolve (node:internal/modules/esm/loader:780:12)
    at #cachedDefaultResolve (node:internal/modules/esm/loader:704:25)
    at ModuleLoader.resolve (node:internal/modules/esm/loader:687:38)
    at ModuleLoader.getModuleJobForImport (node:internal/modules/esm/loader:305:38)
    at ModuleJob._link (node:internal/modules/esm/module_job:137:49) {
  code: 'ERR_MODULE_NOT_FOUND'
}

Node.js v22.15.0
Secondly, pnpm doesn't honor the package-lock.json file because unlike npm where you can install the same package and version number multiple times, each with a different set of dependency, each package and version number can only be installed exactly once on a host in pnpm.
Yarn
The first version of Yarn, in my opinion is a mild improvement over npm. It was created in 2016 by Facebook. Back then npm was not as polished as it is today. Yarn introduced some new ideas like caching the packages to speedup installation. Some security checks to ensure packages you are installing have not been corrupted. Yarn uses yarn.lock file instead of package.lock file.
Yarn 2 however radically changed Yarn. It introduced a system called PnP(plug and play) which is very similar to pnpm. Just like pnpm all the packages reside some where in a global location on the disk. But unlike pnpm there are no soft/hard links to these packages or files within those packages. Instead there is a single file called pnp.js at the root of the project that contains the on-disk location of various dependencies.
While this idea sounds revolutionary and amazing, Yarn PnP faces significant challenges in adoption. A lot of legacy tools, IDEs, native modules etc. expect a directory called node_modules at the root of the project. Yarn 2 has since addressed this issue by adding an option to create node_modules and have it populated with the dependencies of your project. Another issue that Yarn PnP faces is that of significant learning curve. Developers who are used to a physical node_modules directory are having to re-learn a lot of things. Debugging is also a pain, because error messages related to dependency management are not as clear as they are in other tools. Understanding and reasoning about the dependency graph of your project is also very difficult. Community adoption has been low, so there is very limited ecosystem around Yarn PnP.
Bundling tools - Webpack
The two things that we have discussed so far are one, how to ensure your code can run everywhere. Two, how to ensure that your code has all the things it needs to run. Here we have also ensured that we are not shipping anything multiple times unnecessarily.
The last and final problem that I will tackle in this post is the problem of breaking down your code and assets into multiple chunks. This is so that your browser or your code can download things as it needs. And it can also download multiple things in parallel. There is no point is shipping everything that you built as a single giant monolithic file that your browser has to spend several seconds downloading, before it can parse it and render it's contents. We want to send content to your client's browsers in smaller chunks that are enough to create an interface that the user can start interacting with quickly.
Modules
Before we talk about how to break our code down into chunks. We have to talk about modules in Javascript. This was a recent feature that was added to Javascript. Before modules, you would import a JS file into your webpage using a script tag. Everything in that file, functions, variables and what not sat in the global scope. If your file needed another JS file, that file would have to be included using a script tag as well. All these JS files were essentially linked into a webpage via script tags. And everything in these script files resided in global scope.
Then came immediately invoked function expressions IIFE. This kind of created a local scope. (function() { var locally_scoped_variable = 0;})().
Then came NodeJS which invented something called CommonJS modules. Basically you would selectively expose things in your JS file using module.export and selectively import what you need to import using a require() statement.
AMD(not advanced micro devices, but Asynchronous module definition) defined a format for modules as well. Using define and require.
Then finally the concept of modules was formalized in 2016. The statements import and export were formally added to ES6 syntax. Now if you want to export something out of a JS file like a constant or a function you would use the export syntax and if you needed to import something you would use the import statement. Pretty straight forward. Anything with an export statement is immediately regarded as a module now.
Webpack
Now with that basic introduction out of the way, let's talk about Webpack. What Webpack needs is the entry script to your app/page/component/whatever you want to be considered as chunk/single unit that should be packed into a bundle as input. Starting from this script, it starts reading and parsing everything that is imported by this script. Yes that's right. Webpack actually reads all of the JS code that you want to bundle and it parses it all. If you think about it, it is kind of crazy to think that your JS code is processed twice before a deployable artifact is created. In the past, the only thing that would read these JS file was the browser. And it would read and execute them as well. But now we have two entites that are reading and processing your JS code in addition to your browser. First the transpiler that reads and transpiles the code to older versions of ES. Then Babel reads and parses your code as well.
Webpack is not a transpiler however. It can only transform import/export statements as these were only recently added to the ES standard in ES6. You need Babel or some other transpiler to actually generate code in older ES syntax. The reason Webpack needs to read your code is for generating a dependency graph. It reads all of your code and based on the import/export statements, it creates a dependency graph in memory. Based on this it creates chunks of individually runnable, self sufficient code. These chunks get grouped into bundles. And each of these bundles are written to the disk as files and can be individually requested by the browser.
Now with that all of that introduction out of the way, lets create our first Webpack project.
Creating a basic bundle
I will start off by creating an empty directory and initializing it with npm init.
Then I will install some libraries that we will need related to Webpack:
npm install --save-dev webpack webpack-cli style-loader css-loader csv-loader html-webpack-plugin
It must be obvious what the first two are. I will explain later what the last 4 dependencies are.
I will also create the following directory structure and files:
├── dist
├── node_modules
├── package.json
├── package-lock.json
├── public
├── src
└── webpack.config.js
Dist is the final distribution directory that will have the final deployable product.
There is a single photo in the public directory that I will link into my webpage using Webpack.
public
└── whitecat.jpg
Src directory has the following files:
src
├── data
│   └── numbers.csv
├── index.js
└── style.css
numbers.csv:
A, B
1, 2
3, 4
style.css:
th {
     background-color: #f2f2f2;
}
And finally this is the content of index.js:
import './style.css';
import csvData from './data/numbers.csv';
import CatPicture from '../public/whitecat.jpg';

// Function to create and display the table
function createTable(data) {
    const table = document.createElement('table');

    // Create table header
    const headerRow = document.createElement('tr');
    Object.keys(data[0]).forEach(header => {
        const th = document.createElement('th');
        th.textContent = header;
        headerRow.appendChild(th);
    });
    table.appendChild(headerRow);

    // Create table rows
    data.forEach(row => {
        const tr = document.createElement('tr');
        Object.values(row).forEach(cell => {
            const td = document.createElement('td');
            td.textContent = cell;
            tr.appendChild(td);
        });
        table.appendChild(tr);
    });

    return table;
}

function createImage() {
    const catPicture = document.createElement("img");
    catPicture.src = CatPicture;

    return catPicture;
}

document.body.appendChild(createTable(csvData));
document.body.appendChild(createImage());
This looks like it is a lot of code, but it is essentially creating a table using the CSVdata we import and a img tag using the image file we imported at runtime and appending it to the body of the webpage.
The important thing to note here is that we are importing the csv file, the image file and the css style file like they are some ordinary javascript modules. You might have seen this in an actual production facing frontend code base and might have wondered how this is possible! For a long time I used to think that this was a React feature. But I was wrong. This is actually a Webpack feature. I will explain how this works soon.
And finally the contents of webpack.config.js that ties together this whole collection of files.
const path = require('path');

const HtmlWebpackPlugin = require('html-webpack-plugin');

module.exports = {
  entry: './src/index.js',
  output: {
    filename: 'main.js',
    path: path.resolve(__dirname, 'dist'),
  },
  plugins: [
    new HtmlWebpackPlugin({
      template: './src/index.html', // Template HTML file
      filename: 'index.html', // Output HTML file
    }),
  ],
  module: {
     rules: [
       {
         test: /\.css$/i,
         use: ['style-loader', 'css-loader'],
       },

      {
        test: /\.(png|svg|jpg|jpeg|gif)$/i,
        type: 'asset/resource',
      },
      {
        test: /\.(csv|tsv)$/i,
        use: ['csv-loader'],
      },
     ],
  }
};
module.exports is the core part of this file. That is what you need to pay attention to. We export a bunch of configuration options from this file.
- entry: This defines the entrypoint of our script. This is the first script file that Webpack should read when it is constructing it's dependency graph. This could be an array incase of multiple entrypoints. I will dive deep into this option in a later section.
- output: What should the output file for each bundle be called and where should it be placed? All of this are configured in this section.
- plugins: Here we are using a single plugin called HtmlWebpackPlugin. It creates a single HTML file and adds a script tag to that file linking to each of our JS bundles. Note that this is not necessary. It is far more common to already have a HTML file that you will merely copy into the dist directory.
- module.rules: This is the section where all the magic happens. Normally modules are JS modules, but Webpack allows us to treat images, css files, fonts, csv files and a whole lot of other files as modules and import them as JS files. In case of CSS files, they are minified and appended using a style tag to where ever this javascript file that is importing the CSS file is importing it. In case of assets like images, what you actually get from that import statement is the final path of the image in the destination directory after Webpack builds the bundles. The CSV file just gets imported as a 2D array of strings. For CSS and CSV files we had to use an external plugin. If you refer to the command in this section where we installed a bunch of things, you can find the plugins there. These plugins have a special name in Webpack. We call them Loaders. Basically you specify a regex expression for filenames. Anything that matches it will be passed to a loader. You can chain multiple loaders together too. Each one will read it and transform it into an importable module. Note that for images, we did not have to use any loader. That's because Webpack 5 comes with something called Asset modules to handle fonts, images, icons.
Now let's run this whole thing using the following command:
npx webpack
This generates the following files in the dist directory. The image file might have a different name when you run it.
dist
├── a9ef24699a8c494b4497.jpg
├── index.html
└── main.js
If you open index.html in a browser this is how it will look:

- The table has data from the csv file we imported.
- The image was imported and displaying correctly.
- The style file even though cannot be seen in the
index.htmlfile in the dist directory seems to have been imported correctly and the style within in it, was applied to the table header like we wanted.
 (Screenshot of inspect toolbar correctly showing the imported css file)
And that is a brief introduction to how Webpack works. Now I will discuss some advanced Webpack features.
Advanced webpack features
Source maps
Because of all the bundling and renaming that is happening, when something breaks it might be difficult to track down errors. Multiple js files in your source directory could be combined into a single bundle. It's for this reason, javascript actually has a feature called source maps. These sourcemaps map bundles to individual source files. So if something breaks in you bundle, the browser can look at the sourcemap and adjust it's stack trace to tell you exactly what broke.
You can add this option to module.exports of your webpack.config.js to automatically generate sourcemaps. There are various other options available as well. It is not recommended to use this in production environment however(This particular option not source maps in general). Sourcemaps in webpack
devtool: 'inline-source-map',
Dev server and Hot module replacement.
Currently after making any change to any of the files in your repo you would have to run npx webpack each time to build your repo. Of course you could add this command to the script section of your package.json file, so you could invoke this command with a simple npm run webpack or something. But it's still tidious to have to run a command each time you make a change to see if your change worked.
Webpack gives you the option to run a webserver.
You can install it with this command:
npm install --save-dev webpack-dev-server
Note that this is a rudimentary dev server and not intended for production use.
And you would add this option to your webpack.config.js file:
devServer: {
    static: './dist',
  },
And if you run the command npx webpack serve --open it will start serving your files on http://localhost:3000
And each time you update a file or something, it will automatically recompile that file and repack things, automatically update the contents of your webpage that is currently running without needed a full refresh. This is called Hot module replacement
Code splitting
This feature is the most important feature of Webpack. And I would say this feature is the reason Webpack was created. Basically what Code splitting means is to split up your code into more bundles and thus have them emitted as separate bundles, so you could load them parallely or load them on demand or load them in whatever way you think would best utilize the available network bandwith and allows you to quickly get things infront of your users. You can do that with Webpack.
There are three ways to do this:
-
Remember the
entryconfiguration option inmodules.exportofwebpack.config.jsfile? You can specify multiple entry points there. That option is an array. The problem with this approach is that a separate bundle is created for each entrypoint. If there are common chunks between multiple bundles, for examplelodashmight be needed by all the bundles that you are creating. Thenlodashwill be duplicated in all the bundles. Which is wasteful. Your webpage will be downloadinglodashmultiple times. Another obvious problem with this approach is that you are having to manually mark which files go into which bundles. -
The problem with the first approach is that if multiple chunks depend on the same chunk, that chunk is duplicated in multiple bundles. To prevent this problem there are two configuration options we can leverage.
One approach is to pull out all the common chunks between the bundles into a separate bundle and have each bundle depend on that shared bundle like so:
entry: {
    bundle1: {
      import: './src/file1.js',
      dependOn: 'shared',
    },
    bundle2: {
      import: './src/file2.js',
      dependOn: 'shared',
    },
    shared: 'lodash',
   },
Now since you have multiple bundles and you are pulling out all of the common chunks into a separate bundle, you need to be careful to not instantiate any module in the common chunk more than once. This is because several existing libraries and code bases use the global context to keep track of global state. There could be a queue or a counter or the module could be caching things in the global state of a JS module. If you are creating separate instances of the same module in multiple bundles, it would be as if that global state of that module is seeing only updates from a single bundle. You can read more about this problem here
To solve this you need the following configuration option in your Webpack config file:
optimization: {
    runtimeChunk: 'single',
},
This creates a runtime context that is shared among all the generated chunks. A runtime context is typically emitted as a bundle. It contains Webpack runtime logic and also code to import and intialize the chunks. You can also create a separate chunk for each entrypoint as well.
Another option is to use the splitChunksPlugin by adding an optimization section to Webpack config like so:
module.exports = {
  entry: './src/index.js',
  output: {
    filename: 'main.js',
    path: path.resolve(__dirname, 'dist'),
  },
  plugins: [
    new HtmlWebpackPlugin({
      template: './src/index.html', // Template HTML file
      filename: 'index.html', // Output HTML file
    }),
  ],
  module: {
     rules: [
       {
         test: /\.css$/i,
         use: ['style-loader', 'css-loader'],
       },

      {
        test: /\.(png|svg|jpg|jpeg|gif)$/i,
        type: 'asset/resource',
      },
      {
        test: /\.(csv|tsv)$/i,
        use: ['csv-loader'],
      },
     ],
  },
   optimization: {
     splitChunks: {
       chunks: 'all',
     },
   },
}
What this will do is that it will automatically extract all the common chunks between bundles into a separate bundle.
- And the final option we have for code spliting is dynamic imports i.e.
import()notice that this looks like a function call. Anything that we import this way is automatically separated out into a separate bundle. Thus this chunk will not be loaded till the import statement is reached. This is particularly useful when we want to wait loading up some module till the user interacts with a component.
There are two flags that we can specify here in the import statement that are worth mentioning.
import(/* webpackPrefetch: true */ './someRandomModule1.js');

import(/* webpackPreload: true */ './someRandomModule2.js');
Prefetch delays requesting the module to a future time when the browser is idle. And will result in the following code being added to the head tag of the page:
<link rel="prefetch" href="./someRandomModule1.js">
Preload on the other hand starts loading up the module along with the parent chunk where this import statement was located. Also this will cause the following tag to be added to the head tag of the page:
<link rel="preload" href="./someRandomModule2.js">
The next post in this series will cover this in more depth, so I am going to leave this at that.
Treeshaking
Treeshaking essentially means deadcode elimination. Webpack when it is reading through your code and constructing a dependency graph can identify modules that are not being used anywhere. For this to work, you have to use production mode and you need to absolutely use ES6 modules. This will not work with CommonJs modules. Also this does not work with dynamic import statements as well.
Also if a module has a sideeffect i.e. it is changing the global state, it might be a bad idea to eliminate it. In that case it is better to specify in package.json all the files that have sideeffects like so:
{
  "sideEffects": ["./src/some-side-effectful-file.js"]
}
Finally, treeshaking eliminates a few unnecessary modules/chunks which means less code has to be downloaded by the client's browser. Which means faster load times. To further optimize things we could minify our code(which happens automatically in production mode), this removes extra unnecessary whitespaces, replaces variable names, function names etc. with single or as few letters as possible, and a lot of other such space saving optimizations that make our bundles even smallers.
And that's it folks. This is all I wanted to cover in this topic. These are all the options that caught my attention and I thought were interesting in the tools I touched. Please refer to their original documentation. I am sure they have tons of other useful operations as well.